安装
准备及环境介绍
win10
node环境
- npm
git
Github
- 默认有Github账号并且有一定基础使用Git和Github
- 默认ssh配置完成或者使用Http方式
Gitee
- 默认有Gitee账号并有一定使用经验
- 默认ssh配置完成或者使用Http方式
Github和Gitee准备仓库
Github
新建仓库

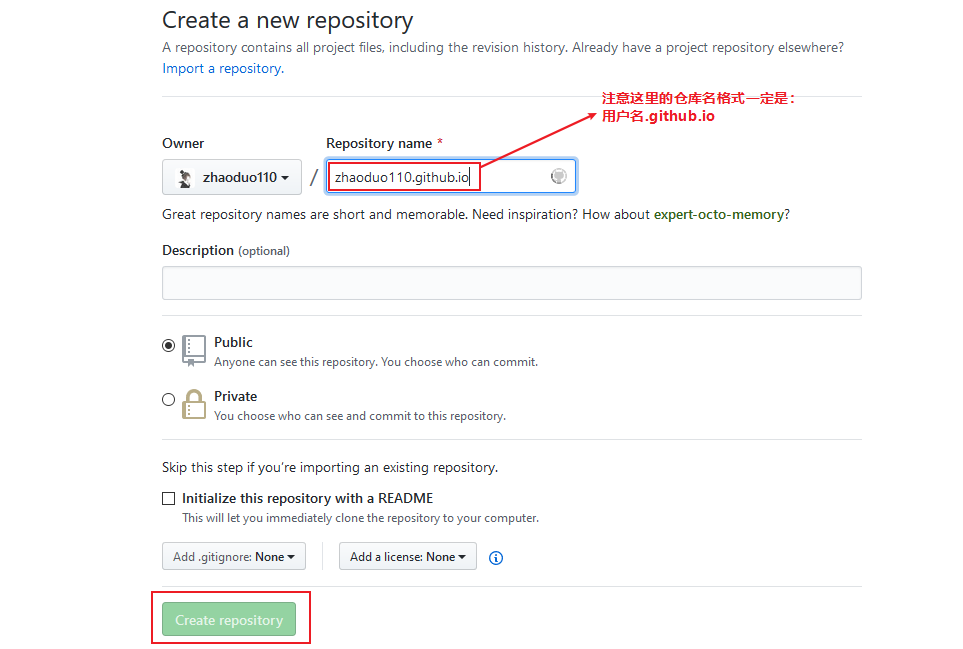
设置仓库进行测试
创建完成后到仓库界面执行以下操作
新建一个html文件


设置Pages主题

选择主题,如果需要绑定自定义域名的话也可以设置

然后访问 https://zhaoduo110.github.io/ 即可看到效果说明配置成功
Gitee
新建仓库


设置Gitee Pages


上步启动后当前页面会更新为如下图所示:

安装Hexo部署博客
本地安装
1 | npm install -g hexo-cli |
执行。blog为项目目录
1 | hexo init blog |
执行完后的目录结构如下
1 | . |
| 文件目录 | 文件目录 | 作用 |
|---|---|---|
| node_modules | ||
| scaffolds | 模板文件夹。当新建文章时,Hexo 会根据 scaffold 来建立文件 | |
| source | 资源文件夹,除 _posts 文件,其他以下划线_开头的文件或者文件夹不会被编译打包到public文件夹 | |
| _drafts | 默认不生成,草稿文件 | |
| _posts | 文章Markdowm文件 | |
| themes | 主题文件夹 | |
| _config.yml | 网站的 配置 信息,可以在此配置大部分的参数 | |
| package.json | 应用程序的信息。EJS, Stylus 和 Markdown renderer 已默认安装,可以自由移除 |
执行以下代码即可在本地浏览器访问 http://localhost:4000 预览效果。hexo会在本地起一个web服务
1 | hexo s |
关联仓库
打开_config.yml,最下面进行修改
1 | deploy: |
可以分别设置仓库和分支
1 | deploy: |
推送Pages
安装插件
1 | npm install hexo-deployer-git --save |
推送
1 | hexo deploy |
注意:推送后Gitee是需要在pages服务中重新部署的,否则不生效
用仓库的不同分支来管理源文件
1. 本地blog目录别名为blog_bak
2. 新建blog目录并进入该目录
初始化本地仓库
1 | git init |
关联远程仓库(Github)
1 | git remote add origin git@github.com:zhaoduo110/zhaoduo110.github.io.git |
3. 把原blog_bak下所有文件复制到blog目录
1 | git add |
创建分支并推送远程
1 | git branch source |
4. 其他机器配置
首先从github仓库中克隆博客源文件
1 | git clone -b source git@github.com:zhaoduo110/zhaoduo110.github.io.git |
如果需要修改博客目录名的话可以进行修改。此处我的修改为blog
1 | cd blog |
关联Gitee仓库
1 | git remote set-url --add origin git@gitee.com:zhaoduo110/zhaoduo110.git |
然后初始化
1 | npm install |
Hexo的简单操作
常用命令
待完善:https://hexo.io/zh-cn/docs/commands
命令:
hexo new [layout] <title>
作用:
新建一篇文章。如果没有设置 layout 的话,默认使用 _config.yml 中的 default_layout 参数代替。如果标题包含空格的话,请使用引号括起来
参数:
| 参数 | 作用 |
|---|---|
| -p,–path | 自定义新文章的路径 |
| -r,–replace | 如果存在同名文章,将其替换 |
| -s,–slug | 文章的 Slug,作为新文章的文件名和发布后的 URL |
举例:
1 | hexo new "post title with whitespace" |
常用操作
重新生成静态文件并部署
1 | hexo clean |
设置主题
以Butterfly主题为例
安装
如果沒有 pug 以及 stylus 的渲染器,请执行以下命令进行下载安装:
1 | npm install hexo-renderer-pug hexo-renderer-stylus --save |
博客根目录下执行
1 | git clone -b master https://github.com/jerryc127/hexo-theme-butterfly.git themes/Butterfly |
安装比较新的dev分支
1 | git clone -b dev https://github.com/jerryc127/hexo-theme-butterfly.git themes/Butterfly |
应用主题
修改 _config.yml
1 | theme: Butterfly |
平滑升级
推荐把默认的主题配置文件_config.yml复制到 Hexo 工作目录下的source/_data/butterfly.yml,如果source/_data的目录不存在就创建一个。
如果创建了butterfly.yml, 它将会替换主题默认配置文件_config.yml里的配置项 (不是合并而是替换), 之后你只需要通过git pull的方式就可以平滑地升级 theme-butterfly了
主题配置
配置:https://docs.jerryc.me/#/config/theme-config
页面:https://docs.jerryc.me/#/config/theme-page
添加标签和分类页面
分类
1 | hexo new page categories |
标签
1 | hexo new page tags |
主题文件配置
1 | menu: |
在文章中设置分类和标签
https://hexo.io/zh-cn/docs/front-matter
1 | --- |
设置完后一般进入到标签和分类页面是不显示标签和分类的,要声明分类和标签页面的类型
修改 source\categories
1 | title: categories |
同理修改 source\tags
1 | title: tags |
修改永久链接
Hexo的永久链接的默认格式是 :year/:month/:day/:title/。这种默认配置的缺点就是一般文件名是中文,导致url链接里有中文出现,这会造成很多问题,如使用gitment,也不利于seo。另外就是年月日都会有分隔符。解决这种问题需要安装 hexo-abbrlink 插件
安装插件
1 | npm install hexo-abbrlink --save |
修改默认配置。_config.yml,找到 permalink
1 | # permalink: :year/:month/:day/:title/ |
写作流程
所有行为都是在source分支(源文件分支)进行的
新建文章
比如 文章名称为 阿里云性能测试简单使用,则
1 | hexo new 阿里云性能测试简单使用 |
编辑文章
本地启动服务预览
1 | hexo s |
生成静态文件
1 | hexo g |
部署
1 | hexo d |
Gitee更新
到gitee博客仓库中找到Gitee Pages服务,进行更新
源文件推送仓库
1 | git add . |
使用技巧
内部连接跳转
1 | {% post_link 文章文件名(不要后缀) 文章标题(可选) %} |